The following audio compressor basics are reprinted from the book “Home Recording Need-To-Know Essentials To Improve Your Mixes“.
Audio Compressor Basics
The Key To Understanding Threshold
Compression is all about stabilizing dynamics, or dealing with changes in volume levels at the track and mix levels. Think of it as a device that automatically moves a track’s fader up and down to keep the track’s volume consistent (but does it much better than you ever could). An extreme symptom that you need compression is this: in certain parts of the mix, you feel the need to slightly (or not so slightly) adjust the volume of a track up or down a bit. You do this, then you feel the need later on to re-adjust. In other words, the track is not sitting well dynamically. Compression is the key to getting that track to play nicely from a volume standpoint. Don’t underestimate the impact that compression can have on your mixes; it will allow you to dynamically stabilize your mix elements, and create a well-balanced mix
There are three main controls in understanding audio compressors: threshold, ratio, and makeup gain. Threshold controls what you compress, ratio controls how much you compress, and make up gain is used to bring the volume levels back to pre-compression levels, since compression on it’s own reduces volume. Let’s discuss threshold first. (Note that there are also attack and release settings, and we’ll talk about more about those further on; let’s stick with the basics for now).
More Audio Compressor Basics: Threshold and Ratio
Audio Compressor Basics: Threshold
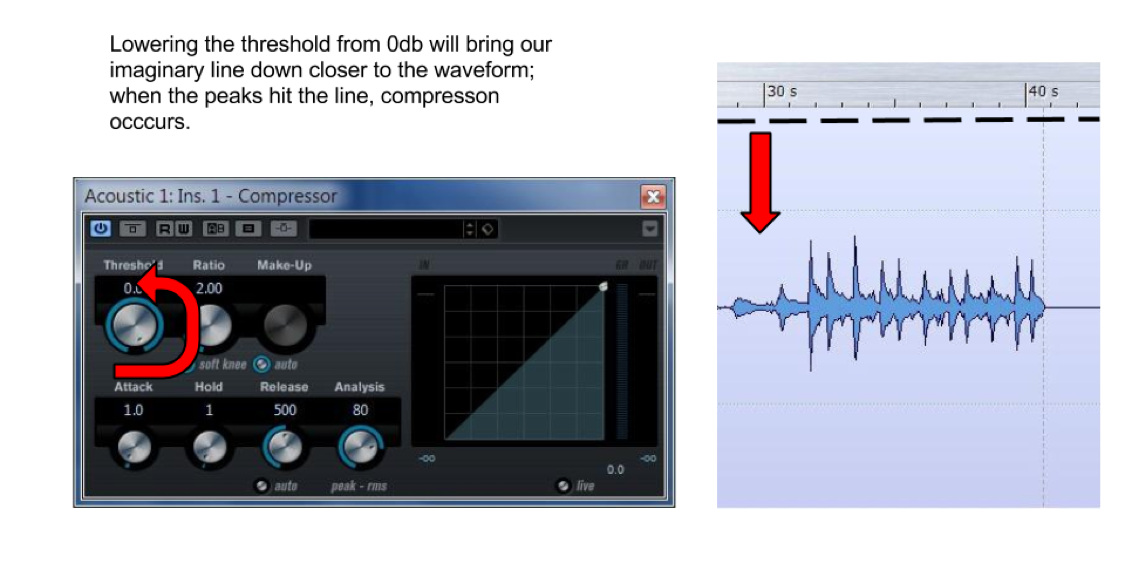
Look at the above illustration. It’s the key to understanding and properly setting threshold, assuming you can use your imagination a bit. The next time you are working in your DAW, call up a compressor as an insert on a track that demonstrates the need for dynamics control, and pick a suitable preset (this will set attack and release times for you). Now, it’s time to set the threshold to compress when we want to. Here’s how to do it:
- Turn the threshold all the way up to 0db. In your mind, you see an imaginary, dotted ‘threshold’ line rise above the top of the waveform.
- Begin lowering the threshold. In your mind, this dotted line will start to come down towards the tips of the waveforms; the more you lower threshold, the more it comes down, closer to the peaks.
- You’ll start to see Gain Reduction (GR) happening when the waveform peaks hit our imaginary threshold line. This means the volume level of our source is being reduced, because it’s triggering the compressor to start working.
- The more you lower the threshold, the more of the source is going to be compressed.
That’s all there is to understanding the basics of the threshold setting! Using our imaginary line makes it easy to envision what the threshold control is doing; which is controlling when and how much of the source track that we compress. The ratio is used to control how much compression will occur; what a segue! Note that some compressor plugins are starting to actually show this line dropping as you lower the threshold.
Audio Compressor Basics: Ratio
Now that we used our threshold to determine what gets compressed, it’s time to set it for how much we compress the audio that is over the threshold. For that, we use our compressor’s ratio control. The key to understanding ratio is understanding that it’s just that… a ratio.
The ratio controls how many decibels of gain reduction occur when our source material exceeds the threshold. A ratio of 2:1 means that, for every two decibels over the threshold, the source track only goes up over the threshold by one decibel. So, if the source was 4db over the threshold, with a 2:1 setting the source track would only be 2 decibels louder, not 4. If the compressor was set to 4:1, and the source was 8db over the threshold, the source would only be 2db over the threshold.
Confused? No worries… think of it this way: the higher your ratio, the more gain reduction is going to occur on the source material that we are compressing based on our threshold. Generally ‘safe’ ratio levels are up to 5:1 or 6:1; higher ratios, and you may risk hearing the compressor working; more on that later!
If we understand both threshold (when to compress), and ratio (how much to compress), we can now set our compressor in a real-world scenario. Keep in mind that, compression should only be used when it’s needed – which is to achieve a dynamic balance of our individual elements. It’s easy to fall into the trap of adding compression to each track because we can; often this leaves our mixes lifeless of dynamics and just plain ‘flat’. Like all of our mixing tools, use compression for a reason! That being said, I compress a lot, because when used moderately it can help to more easily achieve a nice balanced mix. The key is to compress transparently, with reasonable thresholds and low ratios (5:1 and under) – just enough to achieve balance without compression artifacts being heard.
Are you interested in learning more and improving your mixes? Order “Home Recording Need-To-Know Essentials To Improve Your Mixes“.
Combined with downloadable online tutorial files and helpful checklists, and over 25 illustrations to help to make even difficult concepts easy to understand, this 110-page book is by far the best home recording book for beginners, and is priced at just $9.99!
The Best Home Recording Book For Beginners
Topics covered include:
- Understand the impact your room has on your recording and mixes, and what you need to do to properly treat your space.
- Need-to-know essentials so that you spend your limited budget on the most impactful hardware.
- Understanding the difference between using insert vs. send to patch effects; illustrations will clarify these two methods for you.
- Understanding when and why you need to use compression.
- Audio Compressor Basics: A simple approach to understanding the threshold setting on compressors and gates.
- Details on properly setting a compressor.
- How to high pass filter, and why it’s your most powerful mixing tool.
- Advanced mixing techniques: serial and parallel compression, using distortion, multing, and comping.
- Links to downloadable Mixing, Critical Listening, and Recording Session checklists to organize your workflow!
Order HERE!
NHTunes offers access to our studio to musicians across the country, as our online mixing and mastering service is now available! We will mix and master material from artists and bands across the country….. and the world! See more on our online mixing and mastering services HERE.